Create and Restore Virtual Machine Image with Azure
Here is an easy way how you can simply snapshot, “freeze” your Azure Virtual Machine and then restore it whenever you want. This can be useful for creating Virtual Machines for testing purpose. With this process, you can still use your Virtual Machine Image after creating Snapshot.
Create Image from Azure Virtual Machine
Prepare you Virtual Machine
This is really important process where you prepare you Virtual machine:
- In the Azure portal, Connect to the virtual machine. For instructions, see How to sign into a virtual machine running Windows Server.
- Open a Command Prompt window as an administrator.
- Change the directory to %windir%\system32\sysprep and then run sysprep.exe.
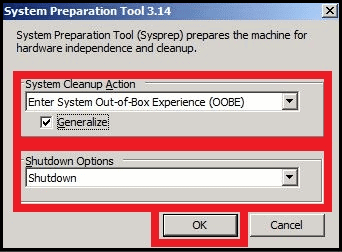
- The System Preparation Tool dialog box appears. Do the following:
- In System Cleanup Action, select Enter System Out-of-Box Experience (OOBE) and make sure that Generalize is checked. For more information about using Sysprep, see How to Use Sysprep: An Introduction.
- In Shutdown Options, select Shutdown.
- Click OK.

Sysprep shuts down the virtual machine, which changes the status of the virtual machine in the Azure portal to Stopped.
Create Snapshot
In the Azure portal, navigate to your Virtual Machine.
Then, select:
- Disks on Virtual Machine menu, after selecting your Virtual Machine.
- Select your OS disk on the right (You could go directly to you disk from Azure portal)
- Create snapshot command from action menu on the top right

5. Name your snapshot and select Create
Now you have Snapshot of your Virtual machine (Disk).
Create Image
Best way to create Image from snapshot is with PowerShell:
- Create variables
$rgName = "myResourceGroup"
$location = "EastUS"
$snapshotName = "mySnapshot"
$imageName = "myImage"
2. Connect to Azure
Login-AzureRmAccount3. Get the snapshot
$snapshot = Get-AzureRmSnapshot -ResourceGroupName $rgName -
SnapshotName $snapshotName
3. Create the Image configuration
$imageConfig = New-AzureRmImageConfig -Location $location
$imageConfig = Set-AzureRmImageOsDisk -Image $imageConfig -OsState
Generalized -OsType Windows -SnapshotId $snapshot.Id
4. Create the Image
New-AzureRmImage -ImageName $imageName -ResourceGroupName $rgName -Image $imageConfigImage with $imageName is created and store on Azure portal.
Create/Restore Virtual Machine from Image
If you want to restore Azure Virtual Machine or create new one from Image, on All resources select your image.
On up right Menu select Create VM and follow instruction same as creating new Virtual Machine.

That’s all, now you have your “new” Virtual Machine created.
[Errors]
If you’ve followed this article be aware that after this process Virtual machine is not usable and you’ll get errors and Virtual Machine will not run or start.
If you have any of the errors below, your virtual machine is not usable anymore.
Azure Virtual Machine is not running / starting
Set-AzureRmVMAccessExtension : Long running operation failed with status 'Failed'.
ErrorCode: VMAgentStatusCommunicationError
ErrorMessage: VM '' has not reported status for VM agent or extensions. Please verify the VM has a running VM agent, and can establish outbound connections to Azure storage.
StartTime: 8/1/2017 12:41:40 PM
EndTime: 8/1/2017 1:07:06 PM
OperationID: 54486c40-20b6-4a97-be62-b4fcf23a68d0
Status: Failed
At line:1 char:1
+ Set-AzureRmVMAccessExtension -ResourceGroupName "" -VMName ...
+ ~~~~~~~~~~~~~~~~~~~~~~~~~~~~~~~~~~~~~~~~~~~~~~~~~~~~~~~~~~~~~~
    + CategoryInfo          : CloseError: (:) [Set-AzureRmVMAccessExtension], ComputeCloudException
    + FullyQualifiedErrorId :
Microsoft.Azure.Commands.Compute.SetAzureVMAccessExtensionCommand


